How to Draw a Birthday Cake Step by Step
A Sweet Beginning: Why Drawing a Birthday Cake Matters
Close your eyes for a moment and picture your favorite birthday memory. Maybe it was the candles flickering, the colorful frosting, or the laughter that filled the room as everyone gathered around. Birthdays are about more than just cake—they’re about joy, celebration, and togetherness. Now imagine being able to capture that magic on paper.
Learning how to draw a birthday cake is not just an art skill; it’s a way of preserving happy memories. Whether you’re a parent drawing alongside your child, a beginner artist practicing new techniques, or simply someone who loves birthdays, this simple drawing project is both fun and rewarding. By the end of this guide, you’ll know exactly how to draw a birthday cake step by step—and you might even find yourself decorating your drawings just like a real baker.
Table of Contents
Why Learn How to Draw a Birthday Cake?
If you’ve ever wondered why people search for “how to draw a birthday cake”, the reasons are simple:
- Creative Expression: Drawing allows you to express joy and celebration through art.
- Perfect for Kids: Children love cake drawings—they’re colorful, fun, and easy to customize.
- DIY Cards & Crafts: A hand-drawn birthday cake makes any greeting card more personal.
- Stress-Free Hobby: Drawing is relaxing and can be a mindful way to unwind.
💡 Fun Fact: Psychologists suggest that creative activities like drawing reduce stress and improve mood—so sketching a birthday cake could be both fun and therapeutic.
Materials You’ll Need Before You Start
Before we dive into the step-by-step guide, let’s prepare the essentials.
Basic Drawing Tools
- Pencil & Eraser: For outlining and correcting mistakes.
- Drawing Paper or Sketchbook: Choose medium-thickness paper for best results.
- Ruler: Helps with neat, symmetrical cake layers.
- Coloring Tools: Colored pencils, crayons, or markers to bring your cake to life.
Optional: Digital drawing tablets (like iPads or Wacom) can also be used if you prefer digital art.
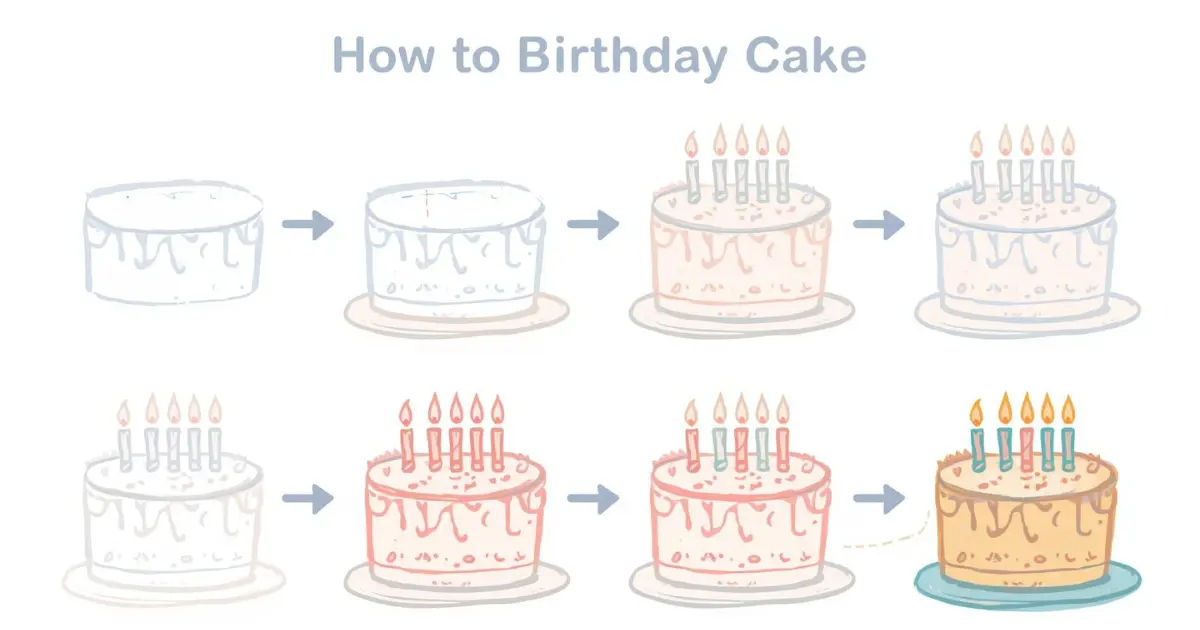
Step-by-Step Guide: How to Draw a Birthday Cake
Drawing a birthday cake may seem tricky, but breaking it down into simple steps makes it easy for anyone.
Step 1 – Drawing the Cake Base
- Start by drawing a horizontal oval for the top of your cake.
- Draw two vertical lines coming down from the oval.
- Connect the bottom with another oval, forming a cylinder shape (the cake base).
👉 Tip: Keep your pencil strokes light so you can erase if needed.
Step 2 – Adding Cake Layers
- If you want a two-tier cake, draw another smaller oval above the first one.
- Repeat the cylinder process to create a second layer.
- For a grand three-tier cake, continue stacking. Each layer should be slightly smaller than the one below.
Step 3 – Drawing Frosting & Decorations
- Add wavy, curved lines along the top edges to look like dripping frosting.
- Draw small sprinkles, strawberries, or cherries for detail.
- To make it realistic, sketch little shadows under the drips.
Step 4 – Adding Candles
- Draw vertical rectangles for candles on top of the cake.
- Add a teardrop shape at the tip to represent the flame.
- Include small lines radiating from the flame for a glowing effect.
Step 5 – Coloring Your Cake
- Use soft pastel colors like pink, light blue, or yellow for icing.
- Bright, festive colors for decorations.
- Mix shading techniques to add depth and realism.
Creative Ideas to Customize Your Birthday Cake Drawing
Drawing a cake gives you endless creative freedom. Here are some customization ideas:
- Themes: Unicorn cake, rainbow layers, chocolate drip cake, floral designs.
- Personal Touch: Add the birthday person’s name or age number on the cake.
- Backgrounds: Balloons, confetti, ribbons, or even a party table.
- Textures: Use cross-hatching for shading or blend colors for a smoother look.
Drawing a Birthday Cake for Kids vs. Beginners
Not every drawing style fits everyone—let’s compare approaches.
For Kids
- Use one-tier cakes to keep it simple.
- Bold outlines and bright crayon colors work best.
- Focus on fun rather than accuracy.
For Beginners (Adults)
- Experiment with two or three tiers.
- Practice shading and highlights to make the cake look 3D.
- Try realistic candle flames by blending orange and yellow tones.
Pro Tips for Perfecting Your Birthday Cake Drawing
Want your cake to look amazing? Follow these tips:
- Light First, Dark Later: Start with faint pencil strokes before finalizing.
- Use References: Look at real cakes online or in cookbooks for inspiration.
- Add Details: Sprinkles, fondant shapes, and decorative flowers add realism.
- Experiment with Angles: Try drawing from the side, front, or top view.
Birthday Cake Drawing Inspiration Table
| Style | Difficulty | Best For | Key Features |
|---|---|---|---|
| Simple 1-Tier Cake | Easy | Kids & Beginners | Basic shapes, one candle |
| 2-Tier Cake | Medium | Teens & Hobbyists | Dripping frosting, sprinkles |
| 3-Tier Cake | Advanced | Art Projects | Realistic candles, decorations |
| Themed Cake | Varies | DIY Cards, Posters | Personalized details |
FAQ – How to Draw a Birthday Cake
What is the easiest way to draw a birthday cake?
The easiest method is to start with simple shapes—an oval for the top, vertical lines for the sides, and a bottom oval to close the shape. Add frosting and a single candle to finish.
Can kids learn how to draw a birthday cake?
Absolutely! Kids can follow a simplified one-tier design using bold outlines and fun colors. This makes the process enjoyable and beginner-friendly.
How do I make my birthday cake drawing look realistic?
Use shading and color blending to add depth. Include details like dripping icing, textured frosting, and candlelight reflections.
What should I use to color my birthday cake drawing?
Colored pencils, crayons, and markers are great choices. For digital artists, tools like Procreate or Photoshop allow advanced shading.
Can I draw a themed birthday cake?
Yes! Themed cakes like unicorn, superhero, or rainbow cakes add a creative twist. Just follow the same structure and add personalized details.
Conclusion
Drawing a birthday cake is more than just a fun art project—it’s a celebration of creativity, joy, and imagination. Whether you’re making a quick sketch with your child, designing a DIY birthday card, or practicing shading for realistic drawings, learning how to draw a birthday cake is a rewarding skill that connects art with emotion.
So grab your pencils, let your creativity flow, and draw a cake that’s as sweet as the memories it represents. And who knows? You might just inspire someone else to pick up a pencil and create their own slice of birthday happiness.